
A properly performed butt fusion on polypropylene piping is a wonder of the modern world: two pieces of pipe (or a pipe and fitting) become one solid piece. The joint is as strong—if not stronger—than the pipe itself. There are no leak paths, and, when properly performed, the fused joint will remain leak-free throughout its 50-year-plus year lifespan.
Of course, the key here is “properly performed.” Good technique and attention to detail will ensure a successful fusion, contributing to a leak-free installation.
According to Lance MacNevin, director of engineering for the Plastics Pipe Institute’s Building & Construction Division, the butt-fusion procedure basically consists of heating the squared ends of two pipes (or a pipe and a fitting), holding them against a heated plate, removing the heat when the proper temperature is reached, bringing the ends together with a certain force, and allowing the joint to cool while maintaining the force.
There are seven essential steps when performing a butt-fusion joint using Aquatherm polypropylene pipe. The steps outlined here are the basis for creating both great piping systems and happy customers.
Step 1: Prep
Proper preparation and organization will help your heat fusions go smoothly.
- First, inspect the pipe itself. Do not use pipe that is damaged or gouged deeper than 10 percent of the pipe’s wall thickness on the outside or 5 percent on the inside.
- Next, set up and inspect the fusion machine that you will be using. Follow all the machine manufacturer’s instructions and perform any maintenance as needed.
- Inspect the facer device and ensure the blades are sharp, tight, and undamaged.
- Inspect and turn on the fusion iron. Make sure the iron is clean and set to 410° F ±18° F (210° C ±10° C). Verify that the iron is at the proper temperature prior to each fusion.
Step 2: Clean
Clean surfaces are essential. The pipe ends being fused must be clean and dry to ensure a good fusion. Clean the pipe ends, facer, and fusion iron to remove any dust, dirt, or other contaminants. Wipe the pipe ends, facer, and iron with a clean, dry, lint-free, nonsynthetic cloth and isopropyl alcohol, 91-percent concentration or higher.
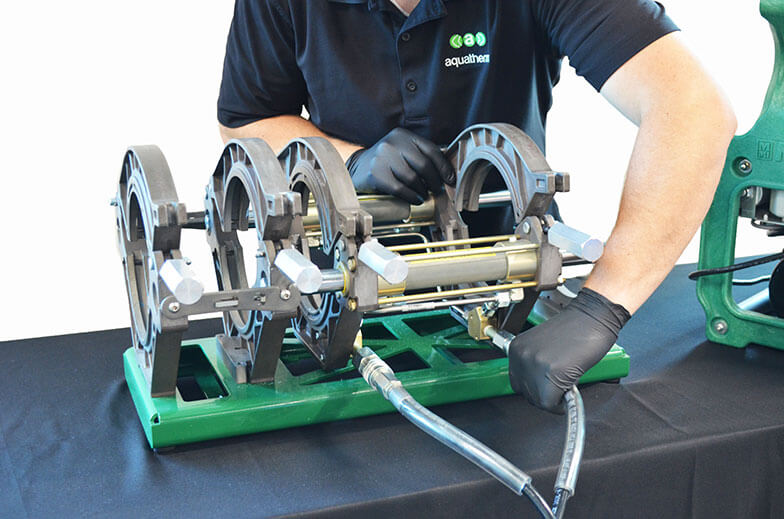
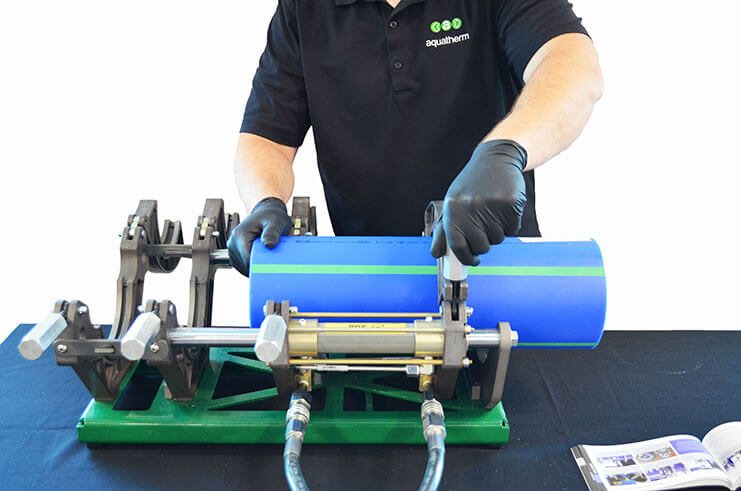
Step 3: Clamp and Align
This step is crucial, as the clamps will hold the pipe as it is being fused, and an accurate alignment will ensure a consistent fusion “bead.” Remember to watch your fingers whenever the fusion machine’s carriage is in motion.
- Set the pipe and fittings into the clamps. Adjust the configuration as needed. Make sure to leave enough room for the facer (see step 4). Tighten the clamps and bring the pipe ends together.
- Check the alignment of the pipes by running your finger or the end of a pen across the gap. If one side is higher than the other, tighten down the higher side.
Step 4: Face the Pipe
The ends of the pipe or fittings must be faced to establish clean, parallel mating surfaces. Proper facing creates smooth and even surfaces for fusion. This step is performed using a device with a rotating cutter head.
- In step 3 you brought the pipe ends together to check their alignment. Now, separate the pipes, while keeping them locked into the fusion machine’s carriage. Open the carriage set and lock in the facing tool. Run the facing tool and let it come up to full speed—do not start the facer if it is pinched between the pipe ends.
- Close the pipes on the facer and increase the pressure until the facer begins shaving off ribbons of polypropylene. Proper facing will produce 360-degree full-width strips on both sides of the facer. When you see two full revolutions of ribbon on both sides of the facer, open the carriage to separate the pipes from the facer, then switch off and remove the facer. (Do not turn off the facer while the carriage is still closed; this can leave nicks on the pipe face.)
Step 5: Adjustment and Bead-Up
- Close the carriage and check for gaps; reface or realign as needed. Reopen the carriage and wipe down the pipe faces with 91-percent isopropyl alcohol.
- Check the fusion machine manufacturer’s information and set the drag pressure and full fusion pressure levels (controls vary by manufacturer). A temperature measuring device, or pyrometer, can be used to verify proper temperature of the heating tool face.
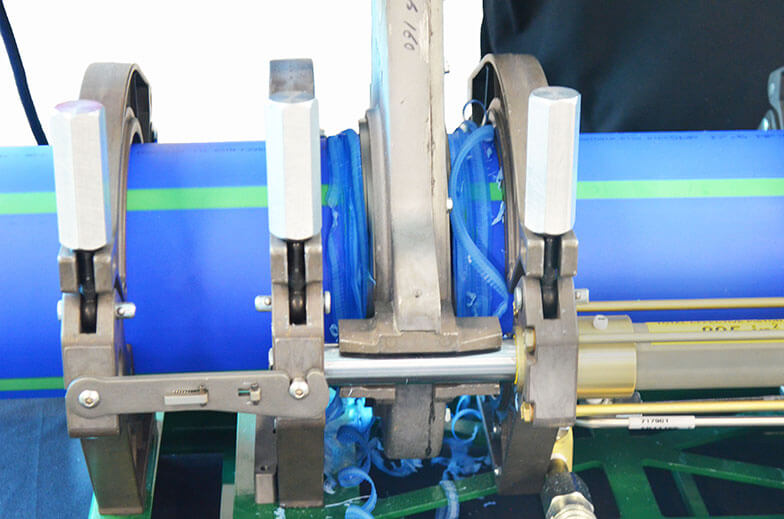
- Open the carriage and insert the heating iron. Close the pipes onto the heating iron under full fusion pressure to begin formation of the adjustment bead. The height of the bead will vary from 1 mm to 2.5 mm depending on the size and standard dimensional ratio (SDR) of the pipe.
- Carefully watch the bead during the adjustment phase and reduce the pressure once the bead reaches its required height. The height of the bead is important during the fusion, as too small a bead may lead to an improper connection, whereas too large a bead can create a flow restriction and also may indicate a problem with fusion pressure.
Step 6: Heat
- Once the adjustment bead is complete, drop the system to drag pressure. If necessary to maintain contact, add up to 10 percent of machine pressure. The heating phase requires as little pressure as possible. Some machines lock in place, only requiring the drag pressure. Others require a slight positive pressure to keep them in place, but never more than drag plus 10 percent machine pressure. Excessive pressure during the heating phase can create an excessive bead and slight restriction in the pipe.
- Use a timer to monitor the proper heating time for the size and SDR of the pipes being fused.
Step 7: Fuse and Cool
- Open the carriage and remove the iron. Immediately bring the pipes together and ensure the machine achieves full fusion pressure within the pressure buildup time. If excessive force is used, melted material may be pushed out of the joint, resulting in contact with cold material, known as a “cold” joint. If too little force is used, insufficient welding of the joint can occur.
- Allow the connection to cool for the specified time for the size and SDR of the pipes being fused. Examine the bead. The final bead should look like one solid piece; a bad fusion will have a split bead with two distinct sides.
- Release the pressure and, once the pressure has been completely released, undo the clamps.
- Remove the fused pipes, or fused pipe and fitting, from the machine. It is ready to hang and to begin providing leak- and corrosion-free service for decades to come.
Conclusion
These steps give you an overview of making successful, long-lasting, leak-free butt fusions with polypropylene pipe. For a complete guide to working with polypropylene pipe, consult the Aquatherm North America Installer Manual, available at https://aquatherm.com/literature/installer-manual. Aquatherm also offers extensive training resources.
In addition, the manufacturers of the fusion equipment offer comprehensive information about their products. It is important to always follow the manufacturer’s guidelines for both the pipe and fusion equipment when fusing polypropylene pipe and installing polypropylene piping systems.
For more information, visit aquatherm.com.